No-Cost SSL in EasyWP with Let’s Encrypt
In the year 2020, having a secure connection to your website in imperative. It shows your guests that you care about their data and privacy and an ‘https’ connection with the ever-familiar ‘lock’ icon establishes a sense of safety and trust with your guests.
SSL certificates, however, are still expensive. This is where Electronic Frontier Foundation’s Let’s Encrypt initiative comes to the rescue. By issuing free SSL certificates for everyone, their goal is to have a safer and more secure internet. If you’d like to know more about this initiative, visit https://letsencrypt.org
EasyWP is NameCheap’s hosted WordPress solution. So I’m assuming your domain is also from NameCheap, however, I’m sure the steps can be applied to any domain registrar.
The way Let’s Encrypt works is that a utility runs in the background on the server and verifies the server and domain with their own servers and issues as well as configure an SSL certificate on there. Yet for hosted platforms like WordPress on EasyWP, this may not be possible. Thankfully, Let’s Encrypt can be run in ‘manual mode’ where a certificate can be generated on a separate machine by performing additional manual verification steps.
Prerequisites
You should have access to *nix based system, for myself I used an Ubuntu LTS VM inside virtual box. It’s worth mentioning that you should be able to escalate yourself to root privileges in said system.
You should also have access to EasyWp control panel for your blog as well as the domain control panel in NameCheap.
The way we intend to use certbot is to execute it in manual mode, ask it to verify our domain via a DNS TXT record challenge. This will yield the necessary private key and certificate which we will proceed to paste into EasyWP control panel.
Install certbot
The Let’s Encrypt utility is called certbot and can be installed on your Ubuntu machine via aptitude package manager.
# apt-get install certbotIf you’d like more information on certbot program usage, check out the certbot command-line documentation here.
Using certbot
Looking at the command-line options for certbot, the options relevant to us are as follows:
- certonly : Sub-command – We want to not install the certificate in the linux vm, so instruct certbot to only generate it but not install it
- -d <DOMAINS> : To identify out target domain (e.g. bilalkaun.com)
- –manual : Run this on our VM and not the hosting server
- –preferred-challenges : Here we specify we want DNS challenge
- –rsa-key-size : Size of the key (default is 2k, you may choose to go higher)
- -m : email address you want to sign up with (used for account registration and identification)
There are some other options we should consider as well
- –manual-public-ip-logging-ok : As part of transparency to the public, Let’s Encrypt plans to publish the IPs of the servers using the certs as well as the hosts. This flag tells certbot we’re ok with that (it’s a requirement in manual mode so make sure you understand the privacy implication and that you’re comfortable with this). More information here.
- –agree-tos : You agree to the Terms of Services (ensure you read and understand them).
- –no-eff-email : Do not share the email with Electronic Frontier Foundation
Generate Cert
In your linux vm, attain root or use sudo and run the following – making sure to replace example.com in the DOMAIN variable and putting in your correct email for the -m option.
# DOMAIN=example.com
# certbot certonly --manual --preferred-challenges dns \
--agree-tos --manual-public-ip-logging-ok \
-m your_email@example.com \
-d *.$DOMAIN -d $DOMAIN
You will get a response like so
Saving debug log to /var/log/letsencrypt/letsencrypt.log
Plugins selected: Authenticator manual, Installer None
Obtaining a new certificate
Performing the following challenges:
dns-01 challenge for example.com
dns-01 challenge for example.com
The next bit is where the interesting part happens. certbot will attempt a DNS ownership test by asking you to add some TXT record to your domain.
- - - - - - - - - - - - - - - - - - - - - - - - - - - - - - - - - - - - - - - -
Please deploy a DNS TXT record under the name
_acme-challenge.example.com with the following value:

8IeWFlrlthP0XK6GyC0Dgd9nb74H31g4vMaqo5xy3xA

Before continuing, verify the record is deployed.
- - - - - - - - - - - - - - - - - - - - - - - - - - - - - - - - - - - - - - - -
Press Enter to Continue
Go into your NameCheap dashboard, go into the domain and click on “Manage DNS”. On this page click on the “Add New Record” button in red and..
- select TXT Record for type of record
- enter in _acme-challenge for host
- paste in the challenge value in the value field
- select 1 minute for ttl (this will ensure shorter dns caching time span for this record).

Apply your changes by clicking the green check mark. Then wait for any record propagation behind the scenes. Wait at least 2 to 3 minutes. Then return to the linux terminal and press enter for it to check the challenge.
PAY ATTENTION – It will ask your to do ANOTHER challenge. It will give you another challenge to ADD. Do not replace or change the previous challenge. Instead add another TXT record with the same host name (_acme-challenge) but put in the new challenge as the value. You should end up with TWO _acme-challenge records this time. Once again head back to the terminal and press enter to continue.
- - - - - - - - - - - - - - - - - - - - - - - - - - - - - - - - - - - - - - - -
Press Enter to Continue
Waiting for verification...
Cleaning up challenges

IMPORTANT NOTES:
 - Congratulations! Your certificate and chain have been saved at:
   /etc/letsencrypt/live/example.com/fullchain.pem
   Your key file has been saved at:
   /etc/letsencrypt/live/example.com/privkey.pem
Take note of the two paths; fullchain.pem and privkey.pem. These are your certificate and private key, respectively. The remaining portion is straightforward. You simply have to add the certificate to EasyWP.
Login to your EasyWP dashboard: https://dashboard.easywp.com/
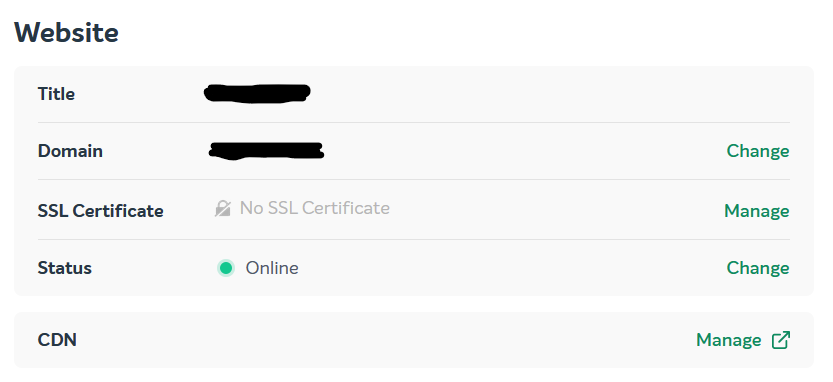
Then click on your domain to enter the domain overview. Under the “Website” heading click on “Manage” next to the SSL Certificate item.
In the resulting page click “Add” and then select “Custom SSL Certificate”
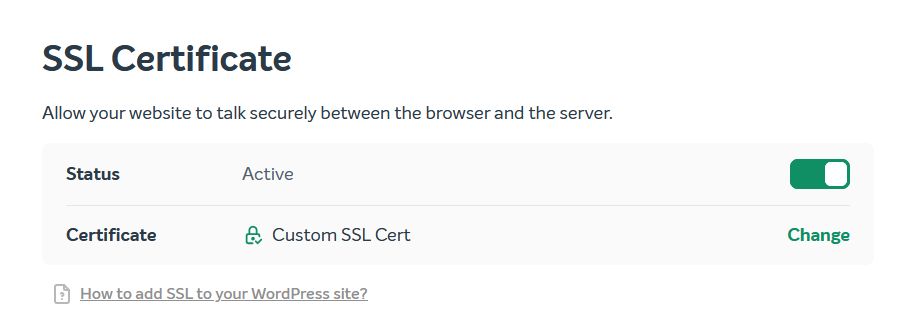
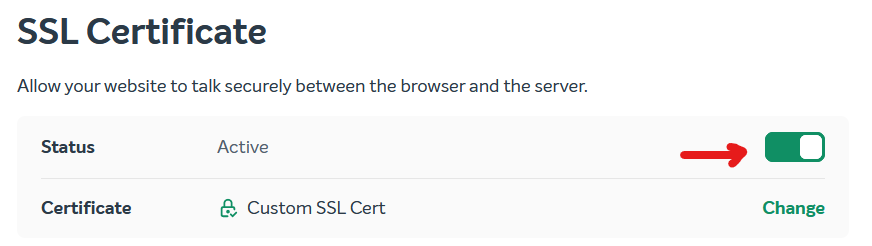
If you already had a custom ssl cert, the screen should look something like the screenshot above, in which case click the “Change” link.

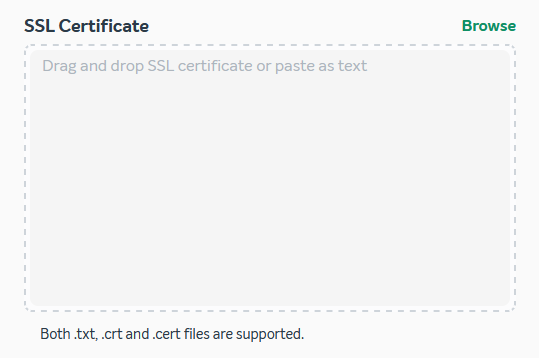
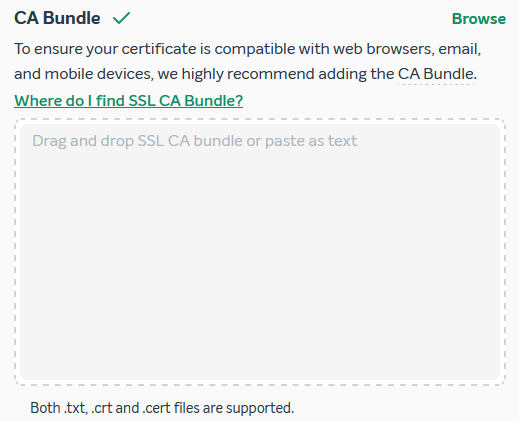
Selecting the Custom SSL Certificate radio button will display three text-areas/upload fields.
- Private Key
- SSL Certificate
- CA Bundle
 |  |  |
Private Key: This the private key used by the server to encrypt outbound traffic and decrypte the incoming traffic (encrypted by the browser/client using the public key in the certificate). Let’s Encrypt creates the aptly named file ‘privkey.pem‘. Either upload this file into this section or copy its contents into the text area.
SSL Certificate: This is the domain’s public certificate, in PEM format, containing the public key and the signing authority’s (Let’s Encrypt) digital signature. This is in the file named ‘cert.pem‘.
CA Bundle: This is a single file containing a concatenation of of your domain’s certificate (the same one as cert.pem), as well as the signing authority’s public certificate, and their signing authority, and so on. In essence a chain of certificate authorities made available to browsers and other clients to make the process to trust chain verification more efficient. See Let’s Encrypt’s trust chain here. Upload or copy the contents of the file named ‘fullchain.pem‘ into this section.
One all text areas are populated, click the “Change” button at the bottom of the page. At this point your EasyWP is SSL secured. Ensure the toggle is set to “active” on the previous page:
Some caveat to keep in mind is that Let’s Encrypt issues certificates only for 90 days. Normally this is fine as certbot automatically renews and reinstalls on the servers. However in this case the entire process will have to be repeated every 90 days to ensure certificates remain valid. An invalid certificate can adversely affect your SEO ratings and lose trust with guests.
0 Comments